It's been a long time since my last post - work arrangements have prevented me from accruing sufficient leave to tour, something that has been very demotivating for me.
But now I have a month free to ride, and will be heading back to New Zealand in a few weeks. I plan to tour around the north of the South Island on a route similar to the one I posted previously.
Preparations are well under way, and the excitement is starting to build. Not long now.
Showing posts with label tour. Show all posts
Showing posts with label tour. Show all posts
Friday, February 13, 2015


Monday, March 4, 2013
Why do I tour solo?
Complete Freedom
This can be a scary yet empowering – having complete freedom. Traveling alone means I can choose or change my itinerary, go to whatever restaurant I want, stay wherever I please, see whichever sights I wish and stay there as long as I want. When I travel solo I don't have to make any compromises. The world is my oyster, quite literally.Challenging Myself
A lot of soul searching can take place when my only companion is my bike and baggage. When I travel by myself I cannot afford to doubt my decisions. I challenge myself to try new adventures, eat different foods and stay in unusual places. These challenges make me a stronger person.Getting to Know the Locals
One of the most amazing experiences while traveling is getting to know the people. I am far more likely to start up a conversation at the local pub with a stranger if I have no one else to talk to.Tuesday, February 26, 2013
Murphy's Law...
Touring EnZed last year I had plenty of time to think about mundane things while riding across the Southlands broad acres. I decided that there needed to be yet another extension to Murphy's Law.
Despite riding on almost deserted roads for much of the journey, I observed:
- If a vehicle approached from behind, then almost inevitably another would approach from ahead and they would cross exactly at my location, and
- If a vehicle approached from behind, then almost inevitably another (and sometimes more) would follow immediately behind it.
I couldn't come up with a name - Murphy's law of traffic improbabilities perhaps...
Thursday, February 21, 2013
Patagonia
I've been thinking about a tour of Patagonia for some years now, but planning a time and a route that fits in with work and family commitments has seemed problematic. But I have finally come up with a route which is slightly less ambitious than originally conceived, and I think this one just might be workable. And possibly I could temp my wife to meet me there with the prospect of trekking the Torres del Paine and Los Glaciares National Parks. The Patagonian touring and trekking season is quite short. The time frame will be February - March to avoid the busy Xmas holiday period and to be finished before the colder autumn weather sets in.
So here's the plan:
Fly in to Santiago and on to Puerto Montt, then take the ferry to Chaiten (A).
The route is broken in several places by ferry crossings, so Google is unable to map the entire route in a single map.
The first road section travels the Carretera Austral (Ruta 7) from Chaiten south to Caleta Yungay. From here it's a short ferry trip to Rio Bravo.
View Larger Map
From Rio Bravo a short section of Ruta 7 continues to Villa O'Higgins.
View Larger Map
At Villa O'Higgins the fun begins, with a ferry ride to the Chilean border post, then a short but difficult overland section on a rough hiking track to the Argentinian border post. Yet another ferry ride across Lago del Desierto reaches the road to El Chalten. Then Ruta 23 and Ruta 40 continues to Puerto Natales (where my journey will end) and beyond, eventually reaching the Fin del Mundo. The total distance will be around 1500 kilometres, much of it on the unsealed roads known as ripio in South America.
View Larger Map
Hopefully there will be time for me to visit some of the fabulous attractions along the way, such as the Perito Moreno glacier, Monte Fitzroy, and the Torres del Paine. If my wife chooses to trek in the region, I'll plan to meet her somewhere, perhaps in Puerto Natales for the trip home. A Navimag cruise up the coast back to Puerto Montt would be a pleasant way to end the trip.
Sunday, February 17, 2013
Gear: A first look at the Helinox Chair One
I have never been a fan of camping chairs - they have always seemed an unnecessary extravagance and an added burden. But recently the Helinox Chair One caught my eye. It is made by DAC, the same company that makes the high quality tent poles supporting my tent, and it has been given glowing reviews by many purchasers. At just a tad under 900 grams it is still a hefty impost on my touring load, but eventually I decided to get one to try out, without committing just yet to carrying it on tour.
Demand for the Chair One has been high, and my order immediately went on hold pending the arrival of more stock, however the shipment promptly arrived at the promised date. So far so good.
The Chair One comes packed in a convenient tote bag with a webbing ladder for attachment to a bike rack or pack, and the assembly instructions are printed on the inside of the bag. Not that they are really needed - it is just a matter of letting the shock-corded tubing segments slip into place then fitting the seat fabric - first to the back poles and then with aid of a little compression, fitting to the front poles. That is all - and it takes no more than a minute.
Then the big moment - the sit on test. This flimsy thing looks likely to collapse under the weight of a big bloke, but no, it can handle up to 145 kilograms. The seat is wide and very comfortable, making it easy to lounge back and relax. But you can also sit forward to tend to camp chores such as the cooking. The hardest thing is getting out of it - for one because it is so comfortable, and also because it is quite low.
All in all my first impressions are very favorable, and I am mentally checking off items that can be jettisoned from my touring kit to compensate for it.
 SPECIFICATIONS:
Assembled: 52 cm wide X 50 cm deep X 65 cm high
Packed: 35 cm long X 10 cm wide X 12 cm high
Weight: 836 grams (897 gm with tote bag - webbing ladder for attaching to pack/bike/kayak etc)
Capacity: 145 kg.
Demand for the Chair One has been high, and my order immediately went on hold pending the arrival of more stock, however the shipment promptly arrived at the promised date. So far so good.
The Chair One comes packed in a convenient tote bag with a webbing ladder for attachment to a bike rack or pack, and the assembly instructions are printed on the inside of the bag. Not that they are really needed - it is just a matter of letting the shock-corded tubing segments slip into place then fitting the seat fabric - first to the back poles and then with aid of a little compression, fitting to the front poles. That is all - and it takes no more than a minute.
Then the big moment - the sit on test. This flimsy thing looks likely to collapse under the weight of a big bloke, but no, it can handle up to 145 kilograms. The seat is wide and very comfortable, making it easy to lounge back and relax. But you can also sit forward to tend to camp chores such as the cooking. The hardest thing is getting out of it - for one because it is so comfortable, and also because it is quite low.
All in all my first impressions are very favorable, and I am mentally checking off items that can be jettisoned from my touring kit to compensate for it.

Assembled: 52 cm wide X 50 cm deep X 65 cm high
Packed: 35 cm long X 10 cm wide X 12 cm high
Weight: 836 grams (897 gm with tote bag - webbing ladder for attaching to pack/bike/kayak etc)
Capacity: 145 kg.
Friday, February 15, 2013
North of the South: Another New Zealand tour route...
OK, here's the likely route I'll take next time I visit EnZed.
Starting in Christchurch and crossing to the west coast via Arthurs pass, then north along the coast before heading back inland through the Buller Gorge up to Golden Bay (D). Next across to the Marlborough district to start the unsealed sections, the Molesworth and Rainbow roads (F-H and H-I). Then back to Christchurch via Maruia (J) and the Lewis Pass. Total distance: 1570km.
Starting in Christchurch and crossing to the west coast via Arthurs pass, then north along the coast before heading back inland through the Buller Gorge up to Golden Bay (D). Next across to the Marlborough district to start the unsealed sections, the Molesworth and Rainbow roads (F-H and H-I). Then back to Christchurch via Maruia (J) and the Lewis Pass. Total distance: 1570km.

Monday, December 31, 2012
Where to tour next?
Well, my tour in New Zealand is done and dusted, and now my thoughts are turning to preparations for the next tour. It's not clear yet when or where this will be, but Patagonian Chile and Argentina via the Carretera Austral is high on the to-do list. However this tour will take more than my annual leave allocation, and I am not yet sure how I will pull it off.
Another possibility is a return to New Zealand. There is the northern part of the South Island I have yet to tour, and I have not set foot on the North Island at all. An NZ top to bottom tour also appeals.
One thought is to take a short motorcycle tour of the North Island in 2013 and accumulate some leave for a Patagonia tour in 2014. Or perhaps I could just take leave without pay.
And there are several potential tours here in Oz - a return to Tasmania for a clockwise Giro, Adelaide to Melbourne via the Great Ocean Road, the southwest of Western Australia, or even Melbourne to Brisbane via the Snowies and an inland route I mapped out some time ago.
The NZ tour went well, although the weather was much colder and more unsettled than on my previous visit. Due to a last-minute unforeseen bike issue I had to fall back on my road tourer, which necessitated some changes to my planned back roads itinerary. Nonetheless it handled the gravel road conditions quite well even on skinny 32mm tyres, and on sealed roads it is hard to beat.
Given the weather conditions, I would have been dubious about taking parts of the planned route anyway. There is nothing quite like cycling down a remote alpine valley watching wave upon wave of advancing snow storms to heighten one's safety awareness.
You can read the NZ tour journal via the Gone Fishin' link in the sidebar.
Saturday, October 6, 2012
Tyre decisions...
So I fitted the 26"x2.0" Schwalbe Marathon Duremes and set out on a test circuit around Mt Coot-Tha. But I was immediately dismayed at how slow these tyres are, and how much extra effort it takes to bring them up to speed.
So next I mounted the 2.0' Supremes and set out on a 60km test ride. and was pleased with the outcome - the tyres are almost as fast as the 1.6" Supremes I've been training on. So the decision is made - the 2.0" Supremes it will be for the upcoming New Zealand tour...
So next I mounted the 2.0' Supremes and set out on a 60km test ride. and was pleased with the outcome - the tyres are almost as fast as the 1.6" Supremes I've been training on. So the decision is made - the 2.0" Supremes it will be for the upcoming New Zealand tour...
Tuesday, October 2, 2012
Tyre choices...
Well, I'm departing for a back roads tour in New Zealand in a few weeks.
I'll be doing plenty of k's on gravel roads, and a fair bit on bitumen
too.
Currently I have 26" x 1.6" Marathon Supremes fitted for my local rides. I really like the Supremes, they are fast and light. My quandary is will they be robust enough for the gravel roads I'll encounter in New Zealand.
So I have sitting in front of me a set of 26" x 2.0" Marathon Supremes, and a set of 26" x 2.0" Marathon Duremes, which are quite a bit heavier, but no doubt more durable. Question is, do I really need the added durability? I favour the lighter and faster tyre.
Sigh - decisions, decisions...
Saturday, August 25, 2012
Gone Fishin' tour of New Zealand
Plans for this years tour are beginning to firm up. Flights are booked - I'll be
departing for Dunedin on October 19 to spend a month touring mostly the
back roads around the bottom of the New Zealand's Southland.
From Dunedin I'm going to ride part way along the Otago rail trail then take to the back roads and head north across Danseys Pass and Hakataramea Pass to Lake Tekapo, before turning back south for Wanaka. I did the Tekapo – Wanaka section last tour, this time I'm going to divert cross-country from Omarama to rejoin the Otago Rail, then head to Wanaka via Thomsons Gorge.
I will take a detour in to Mount Cook Village this time, but the main reason for returning to Wanaka (apart from it being a spectacularly scenic place) is that I want to ride the Crown Range Road (the highest in New Zealand) over to Queenstown, where I will take the old steamer TSS Earnslaw across Lake Wakitipu and then ride the back roads to Mavora Lakes, where I'm going to spend some time fishing to see if I can catch some trout in the lakes.
Then I'll head to Te Anau for some more fishing will and probably take an excursion to Doubtful Sound, as I've already visited Milford Sound. From there it'll be right down to the bottom through Invercargill, stopping to see the world's fastest Indian, then on to Bluff, before retuning along the Catlins coast to Dunedin.
There is a new tour journal on the menu where I've posted the details so far. More to come.
Fush'n'chups anyone?
Thursday, August 16, 2012
What about the Rohloff?
The cost of a Rohloff Speedhub is not particularly an issue for me, and unlike other buyers I perceive no need to defend or justify my choice. It's a big ticket item in cycling terms and naturally, one that I expect to deliver significant value for the the expense. So if I'm not satisfied with it, I'm going to say so.
When you read comments and reviews by Rohloff users, it's easy to get drawn in by their obvious enthusiasm for the product. It's rare to find negative comments. Typically positive comments are likely to be:
So now with 3000 kilometers of riding with the Rohloff under my wheels, what do I think about it? Well, I would have to say I'm distinctly underwhelmed:
When you read comments and reviews by Rohloff users, it's easy to get drawn in by their obvious enthusiasm for the product. It's rare to find negative comments. Typically positive comments are likely to be:
- easy to shift
- wide gear range
- evenly spaced gears
- low maintenance
- legendary reliability
- great factory support.
So now with 3000 kilometers of riding with the Rohloff under my wheels, what do I think about it? Well, I would have to say I'm distinctly underwhelmed:
- The Speedhub is generally easy to shift, but I don't find the twist grip shifter very ergonomic. And it does not shift well under load, so shifting performance is no better and perhaps even a little inferior to derailleur gears. But, and this is a big but - the shift from 8th to 7th gears is problematic, and if you don't get it right you can easily find you're in 14th gear just when you don't need it. Yes, you do get used to it, but it's not what I expect from the Mercedes Benz of bike transmissions.
- Yes the range is impressive, but there are only 14 gears to cover the entire range. For me, the steps between the gears are too close. This means that the gear I'm using is alternatively too high or too low, so I'm frequently hunting up and down the gears to find one with a comfortable cadence. Which leads to the next point.
- I have long felt that derailleur gears with typically close ratios in the high range and wide ratios in the low range was a serious flaw, so evenly spaced ratios was one the main attractions of the Speedhub. I've since come to realise the derailleur gear systems have it right - the ratios are close in the most commonly used gears where they need to be, and wide at the infrequently used gears, where there will be a significant drop in pace anyway.
- By repute the Speedhub is very reliable, but dig a little deeper and you start to find reports of cracked flanges, worn bearings, and oil leaks. Not an avalanche by any means, but enough to dispell any notions of infallibility.
- And by all reports it seems that Rohloff do provide excellent support. But the hub has to be returned to Germany in the advent of a failure, and that may seriously disrupt travel arrangements. There has also been reports of some countries charging import duties when the hub is returned.
- Finally, there is one flaw that is seldom mentioned. In the lower gears the Speedhub is noisy. In seventh gear it's very noisy. Annoyingly noisy. Embarrassingly noisy. "You paid all that money to put up with that racket? Tsk Tsk".
Thursday, August 2, 2012
Van Nicholas Pioneer update...
Nearly 3000 kilometers have passed under the wheels since the Pioneer build was completed, so it's a good time for an update.
Remarkably, the bike has required little in the way of adjustment or fine tuning since putting it on the road. A minor tweak to the angle of the bar ends, and a tightening of the headset is about all. Oh, and a tightening of the chainring bolts, which worked loose.
That is not to say there have been no changes - the Supernova E3 Pro lightset has been installed. The 26" x 2.0" Schwalbe Marathon Dureme tyres swapped to narrower 1.6" Marathon Supreme for the urban riding that I'm mostly doing. The Rohloff hub now has a 17 tooth sprocket to lower the gearing a little, and to correct a minor chainline misalignment, the original 118mm bottom bracket was replaced by one with a 122mm axle. And I added a mirror. Yes, me - with a mirror on my bike.
On the road, the Pioneer is a real pleasure. The cockpit is roomy, and it is easy to pedal out of the saddle, but the reach remains comfortable. Despite having the tyres inflated hard for urban riding, the titanium frame soaks up road vibrations and provides a lovely smooth ride. The brakes are extremely powerful, and I'm confident they will easily control the speed of the loaded bike on any steep mountain descents. The steering seems agile enough, yet very stable, and I'm getting used to the flat bars. Although wider than preferred, they cannot be further shortened.
There is one aspect of the bike that is a little underwhelming - the Rohloff hub. I will post about this separately, but for now suffice to say that it does not quite live up to my high expectations. I'm keeping and open mind about it until I have completed a loaded tour - who knows, my views may change.
So how does the Pioneer compare with the Sabbath? Very favourably I think. As an expedition bike it is definitely heavier, but the handling and ride qualities are very similar, and the brakes are much better. I'm looking forward to my next tour when I'll be tackling a few back country roads in New Zealand. More about that later.
Wednesday, December 14, 2011
Tour journal relocation completed...
Well, I've now relocated both my tour journals and my articles. You can find links to them on the sidebar.
I'd have to say I'm delighted with the way the relocation has worked out - it was relatively painless and not particularly time-consuming. And the look and feel is far superior to the way they look previously. No doubt they'll evolve a little more but for the moment I'm very satisfied with them.
I'd have to say I'm delighted with the way the relocation has worked out - it was relatively painless and not particularly time-consuming. And the look and feel is far superior to the way they look previously. No doubt they'll evolve a little more but for the moment I'm very satisfied with them.
Thursday, December 8, 2011
New location for my tour journals...
In recent months I have become weary of the biased and tiresome rants posted by the moderator of the site where my tour journals have long been published. And I wanted them to have a more flexible organisation and a more contemporary presentation than the rigid, monochromatic, hobbyist look constrained by the original location.
But where else could I put them? It is difficult to find somewhere, some way to present them as a journal, chapter by chapter rather than in the strict chronological format used for blogs. I spent hours, days - searching through countless blog and web site templates looking for one with the right structure.
And after a lot of searching I found the answer was right under my nose - there is a Blogger help page that gives detailed guidance about how to format a blog and edit the template for presentation as a book.
So I have deleted my journals In Tasmania and Chasing the Long White Cloud from their former location, and I'm in the process of publishing them on Blogger. You will now find a Tour Journals section on the sidebar, which will eventually have links to all my journals. For now they remain a work in progress and don't yet have the final journal structure that I want, but stay tuned, they will be done soon.
I have also deleted my articles Approaches to Brisbane and Getting Started with Clipless Pedals, and published them in the Pages section on the sidebar. I hope you find them useful.
Monday, November 7, 2011
Van Nicholas Pioneer project...
The Pioneer has to live up to the very high standard set by my Sabbath Silk Route, the bike I rode yesterday and which I used last year in New Zealand. And judging by this morning's relative short (around 32km) ride it's certainly going to achieve that standard.
Despite my good intentions, I didn't actually get up until 6am and set out about 20 minutes later on the River Loop. It's a very popular Brisbane cycling route with a mix of flat and undulating terrain and a decent hill thrown in for good measure. The bike felt immediately comfortable, so my choice of frame size and stem length seem to have been good. I made a brief stop after about 20 minutes to raise the palm rests on the Ergon grips a little, but otherwise the riding position seems comfortable and natural.
Without a computer fitted I don't know how the road speed compared, but my impression is that it is slower than the Sabbath. That can probably be put down the rolling resistance the 26 x 2.0 inch Schwalbe Marathon Dureme tyres I have fitted. This afternoon I'm going to fit a set of Marathon Supremes - the tyre used on the Sabbath, lighter and far more suited to road riding than the Duremes.
It's probably going to take a few decent rides to get used to the slightly wider gear spacing of the Rohloff hub, and I need to master the technique for downshifting on hills. But it seems likely that the 39 x 16 gearing combination I've selected will allow 11th gear (1:1 ratio) to be frequently used on the flats. And descending Highgate Hill in 14th gear I didn't spin out, even thought my speed was probably around 50 kph. The one thing that surprised me about the hub is how noisy it is in the lower gears. I had been warned to expect this, but it's likely the titanium frame transmits and maybe amplifies the sound so it seems rather loud. Some users report that the hub becomes quieter with use, I hope they are right.
Handling wise I had been expecting the steering to be slow with the long chain stays and wider bars, but it is actually quite agile and seems to turn just as hard as I can lay it over. But it's also very stable and shows no signs of any tendency to shimmy at high speed.
When I arrived at the Coffee Garage at Southbank, the only touring bike amongst maybe 100 or more road bikes, I was very surprised when a bunch of roadies showed a lot of interest and even asked if they could take photos. Wonders will never cease...
Overall I'd have to say I'm delighted with the result. The ride and handling live right up to my expectations. The fit is as good or better than any bike I've owned. It looks and feels fantastic. It's probably a little slower than the Sabbath, but that is to be expected since it is heavier and has wider tyres. I think we are going to be very happy together.
Sunday, November 6, 2011
Van Nicholas Pioneer project...
Well - the bike is pretty much finished now except for the lights and wiring. Tomorrow will be its first real outing.


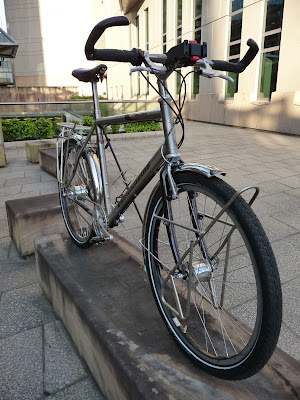


Wednesday, November 2, 2011
Van Nicholas Pioneer project...
Last night I installed the v-brakes, and this afternoon I got home early from the office Melbourne Cup function and ran the brake cables. So I just got back from my first ride, just a short one in the dark - about 5 kilometers. Except for a little brake squeal (the pads need some toe-in) everything performed flawlessly, and on first impressions the bike is going to be a real pleasure to ride. With luck I'll have the fenders, racks and lights installed by the weekend and get a good long ride in. But I think I'm going to exchange this hard new saddle for the almost broken in one on the Sabbath first.
Monday, October 31, 2011
Van Nicholas Pioneer project...
A couple of minor irrits were encountered along the way. The inner chainguard fouled the chainstay and had to be removed. I could have saved $10 and ordered the single chainguard version. And the chain - the singlespeed chain I ordered was too wide for the sprockets, so a quick trip to the lbs was required to get the right one.

During the assembly I discovered that the Stronglight crankset is manufactured by Sugino, and it has XD2 forging marks on the back.

Sunday, October 30, 2011
Van Nicholas Pioneer project...
I didn't make much progress with the build last weekend - I'd forgotten to buy a crown race installer. But Wiggle came to the rescue and had one to me in 4 days. Interestingly, the bargain-priced work stand I ordered from Torpedo 7 the day before still hasn't arrived. It would have been handy this weekend. Torpedo 7 today sent an customer satisfaction email asking for my feedback about the purchasing experience, and whilst I'm not (yet) particularly put out by the non-arrival of the stand, I will be making the comparison with the service provided by a merchant on the other side of the world.
First task is to install the headset cups. Notice the reflections of the lovely view from my 16th floor balcony. That is Mt Coot-Tha you see in the background.

Then install the crown race, and using the cutting guide, cut the steerer to length.

Finally, assemble the steerer, add handlebars, wheels, seatpost and saddle, and suddenly it's a bike.

Titanium is chosen for its strength and light weight. The rationale is I'm here for a good time - not a long time. Another 10 years will see out my cycle touring career, and I want it to be as pleasant as possible. I've heard all the arguments, but have enough personal experience at bushwalking and high-altitude trekking to understand that I have no need or desire for an indestructible battle tank.
Sunday, October 23, 2011
Van Nicholas Pioneer project...
Assembling a bicycle is quite easy really. There aren't that many parts - just the frame, wheels, handlebars seatpost and saddle. Then there are the brakes, stem, cranks...hmmmm, actually there are a lot of parts - all of these in fact.
Frameset: Van Nicholas Pioneer Rohloff Hand Brushed Titanium Large 55cm
Fork: Van Nicholas VNT TRX Alloy Expedition/Touring
Headset: Chris King NoThreadSet Devolution Silver
Saddle: Brooks B17 Special Honey
Handlebar: Van Nicholas 31.8mm OS 3AL/2.5V Titanium
Stem: Van Nicholas Titanium 100mm
Grips: Ergon GC3 Series Rohloff Large
Seat Post: Van Nicholas Titanium 300mm, 27.2mm zero setback
Chainset: Stronglight Impact Rohloff 170mm 39T (Double Guard)
Bottom Bracket: Bushnell Eccentric, Shimano UN54 68x118mm, Problem Solvers Left Aluminum Cup Silver
Chain: SRAM PC 7X Nickel Single Speed
Pedals: Shimano PD-M785 SPD Deore XT Trail
Gear Shift: Rohloff Twist Shifter and cables
Brake Levers: Avid Speed Dial SL Silver
Brakes: Avid Single Digit SL Silver
Brake Pads: Swissstop Blue for Ceramic & Carbide CSS Rims
Tyres: Schwalbe Marathon Dureme 26 x 2.0 Folding Black Reflective
Front Hub: Schmidt SON 28 Dynamo Hub Silver
Rear Hub: Rohloff Speedhub 500/14 CC OEM2 Silver
Rims: Rigida Andra 30 26" MTB CSS Black 32 Hole (with Rohloff Drilling for rear)
Spokes: 14/16g Sapim Race Stainless Steel Butted
Skewers: Hope Quick Release Stainless Steel MTB
Front Rack: Tubus Nova Lowrider Stainless Steel
Rear Rack: Tubus Cosmo Stainless Steel
Front Light: Supernova E3 Pro Terraflux
Rear Light: Supernova E3 Luggage Carrier Mount
Charging System: Biologic ReeCharge Power Pack
Fenders: Velo-Orange Stainless 60mm 26" ATB
Bottle Cages: Salsa Nickless, BBB Fuel Tank XL
Handlebar Bag Bracket: Rixen Kaul Klickfix, Rixen Kaul Extender
Sidestand: Pletscher Comp Zoom
Get them all together and they look like this.


Subscribe to:
Posts (Atom)